Using Toyota Techstream TIS under OS X
Wednesday, 13 April 2011
BACKGROUND INFO
After moving from VWs to Toyotas a couple of years ago I started to realize how spoiled I had been with respect to having access to a decent scan tool. With Volkswagen I used Ross-Tech’s VCDS (previously called simply VAG-COM), which worked quite well. But with Toyota at the time the options were quite limited, which was unfortunate as I owned a Prius and you need a scan tool to do pretty much anything. At the time you had some scan tools that were compatible, to varying degrees, with most Toyotas. Probably the best of the lot was AutoEngenuity’s scantool. But it was more general-purpose, and as such it didn’t support a number of the Toyota-specific functions that a genuine scantool would.
Then Toyota decided to support a J2534 device in their own software, the Drew Technologies Mongoose. Using a Mongoose you can run Toyota’s Techstream TIS on your PC and have access to the same diagnostic data that your dealer has! And the price was fairly reasonable at about $500USD.
But since the Mongoose is essentially just a J2534 interface shouldn’t any J2534 adapter work fine? In theory it should, but it depends on exactly how well the manufacturer implemented the protocols. One that I can say does work nearly flawlessly is the Tactrix Openport 2.0, which is what I own and use and is a steal of a deal at $169USD.
The next issue I had is that I wanted to use the software on a Macbook Pro, and preferably in a virtual machine. I’ve found that it’s quite do-able using the free & open source VirtualBox software. Presumably it should work equally well in Linux, and likely a similar process would work with other virtualization products such as VMWare or Parallels, though I haven’t tested any other configurations.
IMPLEMENTATION
- Download and install VirtualBox for OS X.
- Create a new VM for whatever version of Windows you’re using and install Windows in it. VirtualBox walks you through the fairly simple process so you probably won’t need more documentation. But if you do you can read about the process here.
- Once Windows is up and running properly you need to shut it down so that you can access the settings for the VM. Note that this is not the same as saving the machine state! You need to actually shut down the VM. Once you do, in the VirtualBox Manager the Settings button will be available to you.
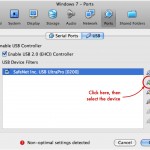
- Connect your interface cable to your Mac’s USB port. Open Settings, go to the Ports tab, the USB sub-tab, and click the icon of the USB cable end with a + over top, then select your interface cable from the list of devices in the drop-down box, ie:This will force VirtualBox to take control of the device when your VM is running and you plug in your interface. Click OK to save the changes.
- Unplug the adapter from your Mac. Start your Windows VM in Virtualbox. Once it’s started you can install Techstream TIS (available from Toyota with a subscription, as well as from several nefarious websites). You can read this pdf to gain some insight into how to install the software, but it’s pretty straight-forward.
- Once the software is working correctly plug the interface into your Mac and configure Techstream as necessary to use the adapter. C’est fini!
